
Hanging Acoustic Panels: What Are Your Options?

How many times have you been in a situation where you wanted to leave the theatre in the middle of a play just because you couldn’t hear and understand what the actors were saying?
Or, have you ever wanted to leave a romantic dinner with your darling just because you couldn’t exchange the glances and sweet words due to the unbearable noise from the other guests?
The noise is an extremely annoying factor anywhere it occurs, not to mention how unhealthy it is.
Luckily, there is a solution to this problem.
Acoustic Panels – What are They
Modern construction and infrastructure have found multiple ways to relieve facilities of the disadvantage and one means to achieve this is the installation of acoustic panels inside the closed spaces.
To be clear, acoustic panels are the panels used to absorb sound and are placed on the walls and/or ceilings of various rooms so as to make the control and reduction of noise possible at all times.

We recommend the Acoustic Pro Fabric Wrapped panel. Fabric is 2x more effective than foam in sound absorbing. It also improves sound quality and speech intelligibility by reducing reverberations and echoes and it is Made in the USA.
ATTENTION: Do not mix sound absorption with soundproofing! Soundproofing means stopping the sound to travel from one room to the next while absorbing means making the room where acoustic panels are installed less noisy.
Read more about the difference here: Soundproofing and Sound Absorption: What’s the Difference?
The Effect of Acoustic Panels
As we have established, acoustic panels are placed inside closed spaces to enhance the sound properties by eliminating echo and controlling comb filtering.
For this aim, they are made in various sizes and thicknesses depending on the size of the room you want to install them in.
Of course, you can find them as standard, or they can be custom-made to meet your specific requirement.
As a core material inside these panels, you can find waterproof polypropylene (PP), cotton - eco-friendly, polyester - highly resistant to impact, fibreglass, and acoustic foam.
Whichever of the cores that you choose from, they all come with specially designed finishes, such as fabric, metal, wood, or paintable material.

It is interesting to note that neither of the finishes affects the primary function of the panels and they are an excellent aesthetic addition.
Due to the aforementioned, besides using them to absorb the sound, they serve as decorative items as well.
Since their main application is treating the acoustics in recording studios, theatres, churches, listening rooms, and the like, they mostly reduce resonance in a room, without eliminating it completely.
Once you install acoustic panels, it will enable for a clearer sound since you will achieve effective control of undesired echo and reverberations.
You might also like: The Best Acoustic Panels and Soundproof Foam
How to Hang Acoustic Panels
If you think that hanging acoustic panels is a complicated business, let me tell you otherwise.
Installing these panels on your walls or ceilings is a piece of cake, and the undertaking will not require many tools.
There are, of course, free-standing panels too, but here I’ll focus on the ones you fix to your walls.
Majority of manufacturers of acoustic panels offer the possibility to install them for you but you can also perform this as a DIY project in your free time.

Before we proceed to actual steps, know that you can’t just install acoustic panels any place you like.
To achieve the proper absorption, reduction of reverberation and sound dampening and deadening, you need to take into consideration the first, and other known, reflection points.
Otherwise, the sound waves that reflect off walls will create multiple sound distortions, including comb filtering which will be your total buzz kill especially if we talk about listening rooms or music studios.
Anyhow, here we go.
As I mentioned already, you can hang these panels as easily as you would hang a picture.
Some of the typical methods are picture wire, sawtooth hanger, Z-clip, and impaling clips.
Since I would like to provide you with the easiest solution, let me show you how to hang the acoustic panels by using the latter two methods.

Z-clip
The two-piece metal Z-clips are a useful tool to hang anything you like to your walls, so it also works great for the acoustic panels.
Besides the Z-clips you will also need a tape meter, pen, level (metal, wood, or laser), and hand driller.
Note that when installing panels with Z-clips, the mating part of the clip will be fixed to the panel already.
Having said this, let me guide you through the actual installation steps.
- Locate the reflection points on the wall
- Measure the size of the panel
- Use the above-mentioned level, pen, and meter to mark the drilling points on the wall, based on the mating clips already placed on the backside of the panel
- Using the drill, carefully fix the second part of the clip to the wall, taking precaution that the fixing points match the mating clips on the panel
- Place the panels over the clips in the wall matching them with clips already fixed to the panel backside
Once you have completed this, you have successfully installed your acoustic panel by the use of Z-clips.
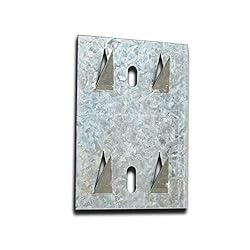
Impaling Clip
The second method of acoustic panel installation I chose for you today is impaling clip.
Obviously, you will need the clip, tape meter, level, marker/pen, a glue gun and industrial construction adhesive.
And as for the hanging procedure, this is how you do it.
- Locate the reflection points so as to identify where to place the acoustic panel
- Use the tools at hand as listed above to make the proper marking on the wall where the panel will go.
- Once you have marked the area, fix the impaling clip to the marked position. Here you can use fasteners or you can use the glue.
- After you fix all four clips, distribute an additional strip of adhesive next to each clip, using the glue gun. Make sure that the additional adhesive strips are on the inside of the clips since they need to hold the panel. These adhesive strips should be approximately the same size (width x length) as the clips.
- Carefully fix the acoustic panel to the clips and adhesive strips making sure that it’s levelled.
With this, your task has been completed successfully.
Final Word: On Hanging Acoustic Panels
In this brief writing here, I gave you some examples with detailed steps on how to fix and hang acoustic panels to walls.
Acoustic panels are a perfect solution for dampening and absorbing echo rendering the room where they have been installed a more pleasing space in terms of noise relief.
Hanging these is rather easy and does not require too much time so you can engage in a DIY project and install these in your listening rooms, studios, and any other room that requires sound absorption.
And, besides the sound absorption effect, they will also come as an interesting decoration points.
So, don't let noise ruin your acoustic impression, but install the acoustic panels instead and enjoy echo-free room.